What is Windows Sandbox and How to Use it?
In the recent Windows 10 update, Microsoft has included a new feature called Windows Sandbox. Although you need to enable it manually if you are using the Windows Insider Program, with the help of this Windows Sandbox. You can test various software without installing that in the actual system. Sandbox provides many functions to the users. If you want to check out what it provides, check out this article because it has everything one would want to know about Windows Sandbox.
What is Windows Sandbox?
Windows Sandbox is a virtual Windows installation inside your actual Windows machine. In other words, you can use Windows 10 virtually with the help of Windows Sandbox. You get the precise same replica of your existing Windows 10 machine but no apps installed. Therefore, you can use this virtual Windows installation to try various apps without any problem.
The main difference between a virtual machine and Windows Sandbox is you do not have to download the Windows 10 ISO separately. It fetches the system image from an existing installation.
What is the use of Windows Sandbox?
On the official documentation, Microsoft included only one point. However, we can use this feature of Windows 10 in several ways.
Many times we get into trouble by installing a third-party app from an untrusted source. Instead of getting a fresh app, we end up getting adware and malware that makes clutter in Windows. At such moments, you can use Windows Sandbox to install that app and check whether it comes with any problem or not. If you think that the app is clean and safe to use, you can install that in your actual Windows machine.
Let’s assume that you want to get a fresh Windows installation to try something new or check some features so that you can perform a certain task. At such moments, you can use this Windows Sandbox feature.
The virtual Windows 10 installation has internet connectivity. Therefore, if you want to try something secretly in your browser, you can try the Windows Sandbox feature.
System Requirements for Using Windows Sandbox
- Windows 10 Pro or Enterprise. It may not be available in the Home version. Also, you need Insider Build 18305 or later version. It is still in BETA version.
- AMD64 architecture
- At least 4GB of RAM
- At least 1 GB of free disk space
- At least 2 CPU cores
The most important thing is that you must have to enable virtualization in BIOS. If you do not enable this functionality, you won’t be able to use Windows Sandbox.
How to Enable and Use Windows Sandbox in Windows 10?
This feature is not enabled by default in Windows 10. Also, you should remember that you must have Windows 10 Insider Preview Build 18305 or later version. Windows Sandbox feature is not available in an older version or stable version of Windows 10. Being said that, you can expect this feature in the next feature update of Windows 10.
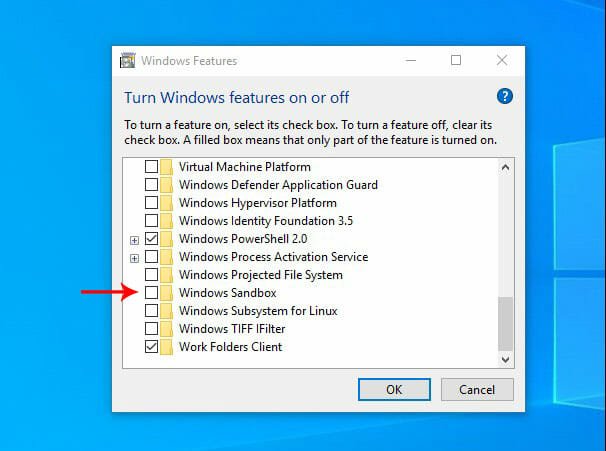
To enable this feature, do follow the following steps. At first, search for “Turn Windows features on or off” in the Cortana search box or Taskbar search box. After opening, you should find a small window named Windows Features. Scroll down in the list and find out “Windows Sandbox.” You have to make a tick in the respective checkbox.

After clicking the OK button, it will take several moments to install and enable this functionality in your system. After that, it will ask you to restart your computer. Following the restart, you can search box Windows Sandbox in the Start Menu, or you can find the same out in the Start Menu.
It takes hardly 10-15 seconds to open the Window. After opening, you can find a screen like this-

As this is a fully functional Windows 10 installation, you can do whatever you want. However, it doesn’t come with all the stock apps of Windows 10. Also, some of the features are not available in this virtual installation as well.
That’s all! Now you can use it to install apps and do other tasks. If you are a Windows Insider user, you can use it immediately. However, if you are a stable release user, you can get this feature in the next feature update.