5 Lesser-Known Features of Notes App for macOS
If you have recently bought a Mac computer, you might have seen that there is an in-built note-taking app called Notes. Notes are not just a note-taking app. In fact, there are tons of use of this simple tool that is made by Apple. If you are new to this app and you want to use it to most out of this tool, you should follow this tutorial.
Best Tips and Tricks for Notes app for macOS
It doesn’t matter whether you are getting started with this app or you are an existing user, you should check out these tips and tricks so that you can know what are the other things that your Notes app is capable of doing.
1. Utilize Continuity Camera
If you do not know what is the Continuity Camera, you will be surprised to know about this. Let’s assume that you are writing a note in the Notes app and you need to insert an image in your note. But the problem is you need to capture the image. At such a moment, you have two options. First, you can capture the image using your phone, transfer that to your Mac computer and then insert the image in your note. However, if you do not like this method, you should try out the second method, which is the Continuity Camera. With the help of this feature, you can directly insert an image in your note using the iPhone. It allows your capture image from iPhone and inserts that in your note. The official Notes app for macOS does support this Continuity Camera feature. Hence, you should use it while creating a note.
2. Import Text in Notes App

Let’s assume that you have a text file with some important information and you want to import that in your Notes app. As usual, there are two different things you can do. First, you can open the text file, copy the text and paste it in your Notes app after creating a new note. However, if you do not like this method, you can make use of the Import option, which is the second method. However, the drawback of the second option is you cannot import a part of a large text file. For that, you need to delete the unnecessary part after importing. To get started with this feature, you need to go to File > Import. Following that, you can select the text file from your computer. Whenever you import a new text file, the Notes app creates a note as Imported Notes.
3. Use Siri to Create Note
Siri has been included in macOS a long time back, and it does support the Notes app. Being said that, this is possible to create a new note using voice command and with the help of Siri, the native digital assistant of macOS. If you can speak, you can create a note using Siri. This is as simple as said. To get started, click the Siri icon visible in the status bar of macOS and enter a command like this-
Create a new note
Create a note
Following that, it will ask you to say what you want to note down. Therefore, you can say whatever you want to include in the note. That’s all! It takes hardly thirty seconds to get things done.
4. Set Password to Lock Down Notes

If you create a grocery list or something not confidential, you can skip this part. However, if you often create notes containing a password or private information, this is very important to password protect your notes. It doesn’t matter whether you use macOS login password or not, you should definitely try this password protection functionality so that you can be on the safe side. To set a password, you need to go to Notes > Preferences. Here you should find an option called Set Password.
Click this button and enter the password you want to set. Following that, go to the home screen of Notes app and select a note that you want to lock with password. You should find a lock button in the top menu bar of Notes app. Click that button and select Lock Note.
Therefore, you can find it locked. Now, if you want to open a password-protected note, you need to enter the password.
In case, you want to remove the password; you need to go to the same Preferences window in the Notes app. From there, you can follow the screen option.
Please note that, when you remove the password as you do not need it anymore, all the previously locked notes remain locked. You need to remove the lock manually. Also, the Notes app uses the same password to lock down all the notes you have selected.
5. Pin A Note

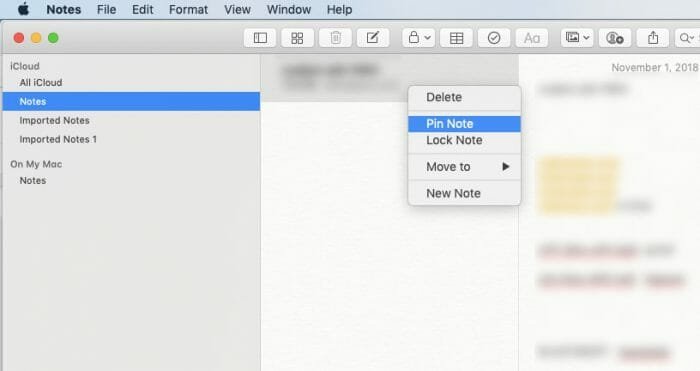
Let’s assume that you do not want to set the Reminders app, and still, you want to keep something in mind with the help of the Notes app. Although it cannot remind you of something as there is no in-built feature for that, you can use the Pin Note option to pin a note so that you can check it whenever you open the Notes app. Many times we write down something important in the Notes app and forget about it after a few minutes. To avoid that, you can pin an important note, and it will be visible on the top all the times. Generally, new note takes the first position. However, if you pin a note, that note will be your first note all the times until you unpin it. To pin a note, select a note > File > Pin Note. Alternatively, you can right-click on the note and select Pin Note.