How To Set Up MX Records For Google Apps Email From Your Website’s Cpanel
If you manage a website and have recently changed your domain’s hosting provider, this tutorial will help you set up Google Apps email preferences for your domain, add MX records from the control panel (cpanel) of the new hosting company.
Late yesterday, I switched the hosting provider of this website – moving from Doreo to Namecheap. There were multiple reasons for the change, I will detail everything in an upcoming blog post.
After the hosting migration was complete, I was unable to send emails from my Google Apps email account(s). I tried sending new messages to multiple email addresses of mine (Gmail, Yahoo), but they never got delivered at all. In addition to this, I was also unable to receive any new emails to my Google Apps email inbox.
Prior to writing this article, I had no idea of setting up MX records in C panel of a Hosting account and how Google Apps sends and receives email from the domain’s email server. I have been using Google Apps for the last two years and never faced any failed email notification whatsoever.
What is An MX record And Why Do You Need To Set It From The cPanel
An MX record or better called as an Mail Exchange record is nothing but an entry in the DNS (domain name system) of your website. The MX record is responsible for accepting email messages on behalf of the recepients domain name and uses a priority value to deliver the email messages to multiple mail servers (if available or applicable).
When you set up MX records in your hosting account’s C panel, you are instructing the DNS system that how the incoming and outgoing email messages should be routed using the simple mail transfer protocol.

Learn more on using MX records for spam filtering.
The above diagram should give a rough idea how mail servers work and why you need to change the MX records in your domain’s c panel to send or receive new messages in your Google Apps email account(s). If you don’t set the appropriate MX records, your domain’s mail server won’t be able to recognize Google App’s email servers and no messages will be sent or received.
Note: Some hosting companies may provide a one click option under C panel which lets users set up Google Apps email, during the time of creating an account (e.g Dreamhost). But it is most likely that you have to configure MX records for Google Apps yourself, manually.
Example: I have one of my Blogger friends saying me this :
Sometimes I get the email in Google Apps, while sometimes it doesn’t. I have seen that it takes some time for the emails to hit my Google Apps inbox, like 10 minutes or so. Since I am not very sure how to set up Google Apps email delivery, I have added an email alias under my domain’s c panel – which gets delivered to my Gmail inbox anyway.
Well, that’s another workaround but certainly not recommended if you have multiple users under your organization. Google Apps is certainly the best email program for web publishers and if you aren’t using it, you are missing a lot of goodness (e.g Google Short URL, Google Docs and other applications).
Setting Up MX Records From C Panel Of Your Hosting Account
1. Open your new hosting account’s cpanel and click “MX Entry” under the “Mail” pane.

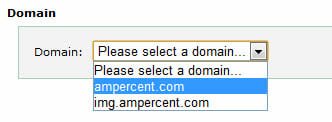
2. You will be taken to the MX entry maintainence page under the hosting account’s Cpanel. Select the domain name for whom you want to set the MX records
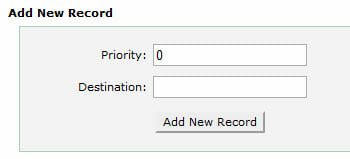
 3. Selecting the domain name will expand more options. You will see a new Text box labelled “Add New Record”, as shown below:

4. To configure your Google Apps email with the domain name in question, add the following records and their corresponding priorities as mentioned below:
- 50 > ASPMX3.GOOGLEMAIL.COM
- 40 >ASPMX2.GOOGLEMAIL.COM
- 30 > ALT2.ASPMX.L.GOOGLE.COM
- 20 > ALT1.ASPMX.L.GOOGLE.COM
- 0 > ASPMX.L.GOOGLE.COM
Remember to add the above entries in the correct sequence. To be more precise, you have to follow the top to bottom approach, adding the ASPMX3 value first and the ASPMX value last.
5. When you are done adding all the MX records that redirects to Google Apps servers, your MX record chart will look like this

6. All done.
Check Your Site’s MX Records
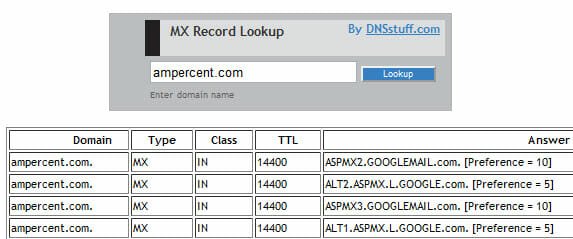
Now that you have added the corresponding MX records from the cpanel, it’s time to perform a MX record lookup and check the records that are associated with your domain. Go to this page, enter your domain name in the text box and you will see whether the mail server records have been updated and propagated across the internet or not.

Important Note: The values in the priority column shows the relative priorities of Google Apps servers and they need not match exactly with your own domain. Different domain providers have different system for setting up MX record priority. Regardless of your domain’s MX record priority, you should add ASPMX.L.GOOGLE.COM as he top priority MS RECORD. Be sure to read Google’s documentation on setting up MX records for your domain.
Disclaimer: This article describes all the steps necessary for tweaking your domain’s MX record entires for Google Apps. The steps involve modifying parameters in your website’s control panel, proceed only when you know what you are doing. If you are a novice, consider opening a support ticket with your hosting provider or ask help from an expert. We cannot be help responsible for any loss that occurs as a result of your behavior.


