How To Password Protect Documents In LibreOffice
If you do not want to spend money on Microsoft Office, LibreOffice seems to be a great alternative. It offers almost all the options that are required to create a document. No matter whether you want to grab a template, use a preset style or anything else, you can find those in the LibreOffice. Nowadays, everyone is concerned about security. If you are creating a confidential document, this is recommended to lock that down. Therefore, learn how to password protect documents in LibreOffice.
No matter whether you are working on a digital document or physical document, you should always take care of the security when you are sharing some confidential data. Not only document but also the same thing applies to a presentation, spreadsheet, etc. The best thing is LibreOffice allows users to password protect documents without taking help of any third-party software.
What is LibreOffice?
LibreOffice is an office suite and Microsoft Office alternative, which is available for multiple platforms including Windows, Mac, Linux, etc. The most important thing about LibreOffice is you do not have to spend money on purchasing this tool since it is completely free. Another important thing to know about this tool is you can find the source code as well. In other words, LibreOffice is an open-source tool that you can download for different popular computer platforms.
Many times, we need to edit a document, but we do not want to spend money on Microsoft Office. Obviously, the Google Docs or Word Online are good substitutes, but if you need a desktop tool, you can opt for LibreOffice.
Like Microsoft Office, LibreOffice takes care of the security as well. As mentioned earlier, there is no need to use third-party software to password protect LibreOffice documents. No matter whether you are using Windows, Mac or Linux version, you can certainly use this same method to lock down all the documents of LibreOffice.
How To Password Protect Documents In LibreOffice
This is pretty easy and not much time consuming as well. Before getting started, you should know an important thing. This software allows you to set two different passwords. One password can be used to prevent others from opening the document. The second password can be used to prevent others from editing the document. The second password will also help you make the document read-only so that others can open and read the document but cannot edit that.
This following tutorial is based on the LibreOffice Writer. However, you can try it on other tools as well.
To get started, open the LibreOffice Writer, and finish the editing. This is not mandatory, and you can set the password before editing as well.
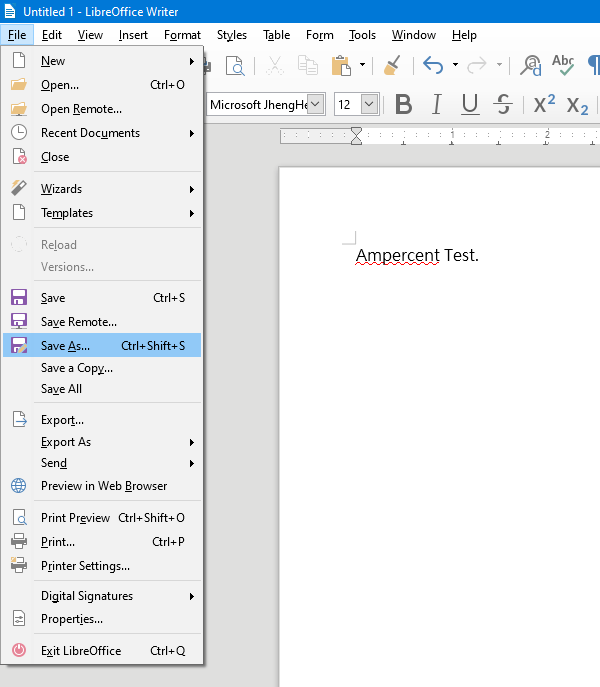
After that, go to File > Save As. Alternatively, you can press Ctrl + Shift + S as well.

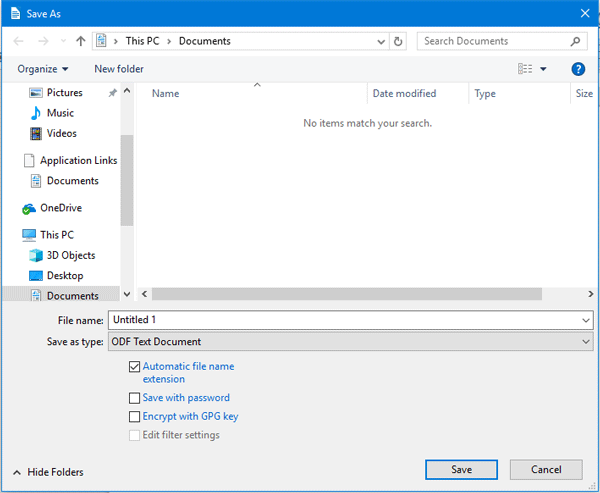
It will open a window where you can find an option called Save with password. This option is responsible for setting up the password for your document. You need to make a tick in the corresponding checkbox.

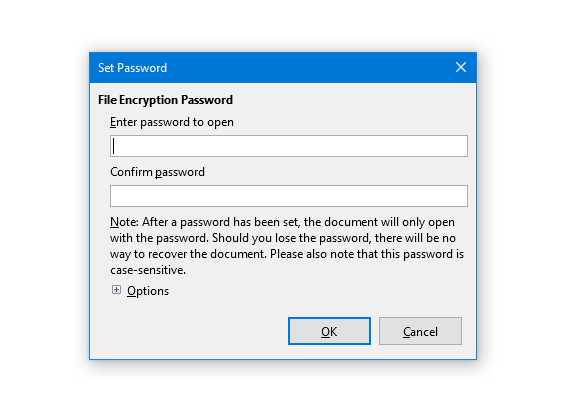
After enabling this option, it will show a popup window, where you will be asked to enter the password.

This password will prevent everyone from opening the document. However, if you want to make the document read-only or prevent others from editing, you can expand the Options menu, and enter another password.
Before entering the second password, you need to make a tick in the checkbox saying Open file read-only.
Now hit the OK button and save the file as usual.
Please note that, if you set both passwords, you need to enter both of them if you want to open and edit the document. It doesn’t matter whether you keep the file in your computer or send it to someone else, you/recipient must have to enter the password.
The most important thing is if you forget the password, there is no way to recover it. Therefore, this is recommended to set a strong password and remember it all the times.