How To Install APK On Emulator In Android Studio
Android Studio is the ultimate solution for Android app developers. It doesn’t matter whether you want to create an app or you want to test it in various resolution; you can make use of Android Studio to get it done. However, if you are getting started with Android Studio and you do not know how to install APK on emulator in Android Studio, do follow this step by step guide to get it done.
With the help of Android Studio, you can create a virtual device. For example, this is possible to get a Pixel 2 XL look-a-like, Android TV emulator, Android Watch or anything that runs on Android. With the help of such virtual device, you can create and test your application before launching it publicly. This is possible to create many virtual machines and test app on each of them without any problem. Although some people face low RAM issue, you should not find any problem if you have at least 8 GB of RAM.

There are only a few system images that support Google Play. That means if you have installed Android Pie or something on a Pixel 2 XL emulator, there is a very low chance of getting Google Play Store in your virtual device. That said, you cannot download or install any app from the Google Play Store, which is the primary source of Android application.
Therefore, if you want to install a third-party app or APK file in your existing virtual machine, here is what you need to do. As Android Studio is available for Windows, Mac, and Linux, you can execute this trick on all those platforms.
How To Install APK On Emulator In Android Studio
The only requirement of this tutorial is you must have the APK file that you want to install. Your system will not fetch the APK file from the internet. There is countless APK download website, and you can use any of them to download your preferred APK file.
After downloading the APK file, you need to paste it in the platform-tools folder. You can find the platform tools folder in the Android Studio installation folder. For example, if you have installed it in the Program Files (x86) folder, the path of platform-tools will be as follows-
C:\Program Files (x86)\Android\sdk\platform-tools
On Mac and Linux, the path will be like this-
/Users/your-user-name/Library/Android/sdk/platform-tools
On Mac, you can go to Desktop >> click the Go button in the status bar >> press and hold the Option button on your keyboard >> click the Library option. Following that, you can go to:
Android/sdk/platform-tools
After pasting the APK file, you need to open the Command Prompt (Windows) or Terminal (Mac/Linux) in this folder.
Windows Users:
Open Command Prompt and enter this command:
cd C:\Program Files (x86)\Android\sdk\platform-tools
Mac Users:
There are two different methods to open the Terminal in that folder. First, you can open the Terminal and enter this command-
cd /Users/your-user-name/Library/Android/sdk/platform-tools
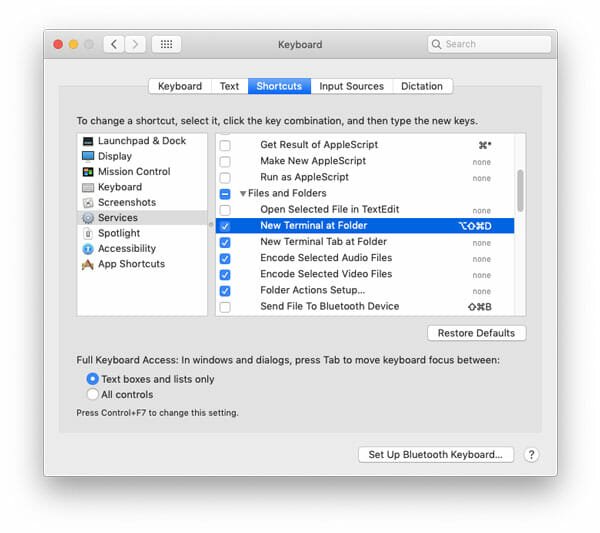
The second method is quite different. You can assign a keyboard shortcut and use that to open the Terminal in any folder. For that, open the System Preferences window and go to Keyboard. Then switch to the Shortcuts tab and go to the Services section.

Here you can find an option called New Terminal at Folder. Click this option and select a keyboard shortcut that you want to assign.
After that, open the platform-tools folder and use that keyboard shortcut to open the Terminal in that folder.
The Linux users can use the same command as Mac to navigate to the corresponding folder using Terminal.
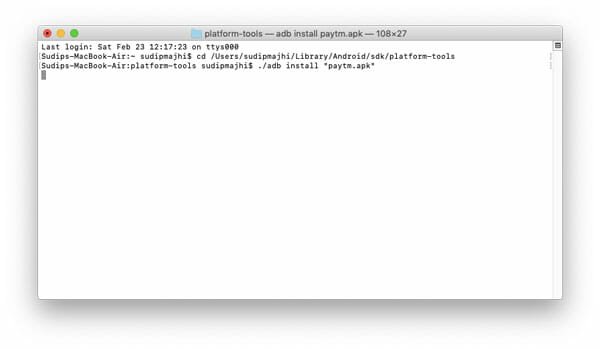
After opening the Terminal or Command Prompt in the respective folder, you need to enter this following command.
Windows Users:
adb install "your-apk-file-name.apk"
Mac/Linux Users:
./adb install "your-apk-file-name.apk"

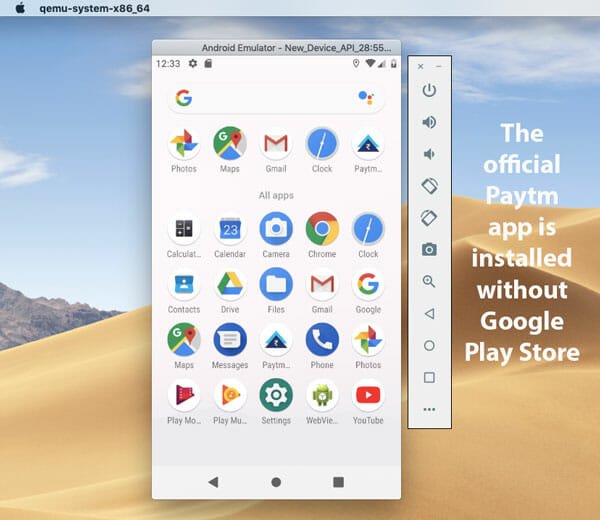
Now you should find the APK file in your virtual device. If you are getting an error message, power on the virtual device and try again.