Merge Data from an Excel Workbook into a Word Document
Merging data from an Excel spreadsheet or workbook is a very basic, yet powerful tool that can save a tremendous amount of time when trying to create documents that have variable fields. Everything from envelopes and letters to name badges and table tents, data merging will eliminate the exhaustive task of typing each record by hand by pulling data from a designated Excel file. Imagine the possibilities, especially for direct mail purposes.
There are three main steps involved in building a merged document. The first and most important is your list and data within the list. You need to make sure the column headings are recognizable and properly labeled. This will allow the mapping process to go a lot smoother (I’ll talk about mapping a bit later).
Let’s say I want to create mailing labels for a “save the date” postcard. The first thing I would do is create the Excel worksheet from which my Word template will pull data from.
Merge Data from an Excel Workbook into a Word Document
1. Open Microsoft Excel or whichever spreadsheet software you use. (This works with Google Docs’ spreadsheets too). Since we’re creating mailing labels, the data we will be merging will be first name, last name, and address.
2. The first row will be the column headings, so in the first cell type the word First, in the next cell type Last and in the third cell of the first row, type Address. Likewise type City, State and Zip in the fourth, fifth and sixth cell respectively.
Now that the column headings are set, fill in the appropriate information for each of the people you are creating a label for. When finished, save your spreadsheet with a name and in a place you’ll be able to locate easily later (I prefer the desktop). Your excel spreadsheet should look like this (with the exception of the specific recipient information:

Now that the list of recipients has been created, the second step is to create the labels template.
1. Open Microsoft Word and click the “Mailings” tab at the top.
2. Next, click the labels button located on the top left of the “Mailings” menu.

3. When the “Envelopes and Labels” dialogue box opens, locate the “Options” button and click on it.

4. The next part is where we choose the labels that we’re using. For this example, I’ll be using Avery Shipping Labels, template #8163. They are 2”x4” mailing labels. So, in the “Label Options” dialogue box, select the appropriate Avery template number and hit “OK”.

5. This brings you back to the “Envelopes and Labels” dialogue box. It should now display that you have selected Avery Template #8163. Click the button that says “New Document”.
6. Now you should be looking at this:
Above is the empty labels template with text boxes inserted that correspond exactly with the specific template you are using (in this case Avery Labels 8163).
Now that the page is set up, we’re going to insert the fields that we want merged onto the mailing label. In order to do this, we need to tell Microsoft Word where to pull the data from.
1. Locate and click on the “Mailings” tab on the top of the tool bar.
2. Click on the “Select Recipients” button and select “Use Existing List”.
3. This brings up a dialogue box that allows you to select your data source from a location on your computer.
4. Locate the excel spreadsheet you just created and click the “Open” button. When you do this a little box pops up asking you which table you want to use within the excel file. Select “Sheet1$”. If you had multiple worksheets in the data file you created, you would want to select the one with the data you want merged. (see image below)

5. Now that the data source has been chosen, it’s time to insert the merge fields based on the headings you created in the data file (Name, Address, etc.). So, locate and click on the “Insert Merge Field” button.

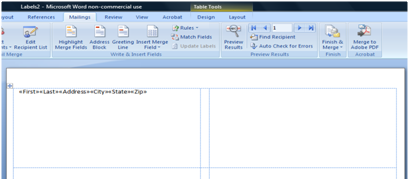
6. Select “First” then repeat step 5(previous step) five more times until you have each of the fields inserted into the text box. It should look like this when you’re done:

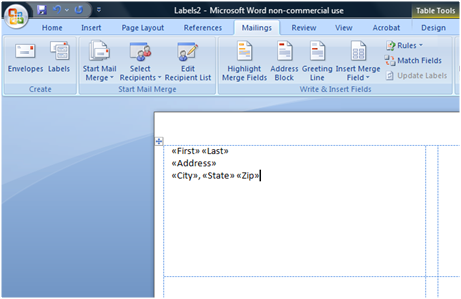
4. If you’ll notice, you just inserted data fields into the word document wherever your cursor was placed. Now, what you need to do is format the text box so that the fields are arranged the way you would want the text to look on the label. Click the mouse cursor in between the “«First»” and “«Last»” fields and add a space. Likewise, place the mouse cursor in between the “«Last»” and “«Address»” fields and hit “Enter” on your keyboard. Add a newline (hit “Enter”) between “«Address»” and “«City»” fields and a space and then a comma after the “«City»” and “«State»” fields. Add a space in between the “«State»” and “«Zip»” fields and add a space. All done, your document should look like this:

5. Next, we’ll want to copy and paste those fields into the next label, so highlight the fields, copy them, then paste them into the text box to the right:

6. Now we want to insert a rule so that it chooses the next record from the data sheet. To do this, click the mouse cursor in front of the “«First»” field of the second box. Then, locate the “Rules” button on the above toolbar and select the “Next Record” rule. Your document should now look like this:
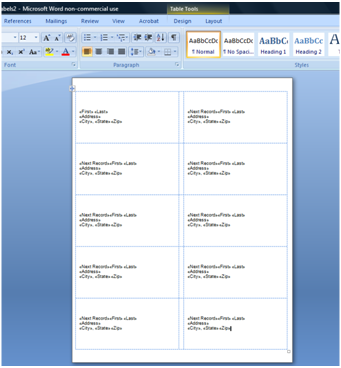
7. The next step is to copy the fields from the second text box and paste them into the remaining eight empty text boxes. So, highlight the fields in the second text box (including the “Next Record” rule), copy them, then click in the next empty text box and click paste. Click in the next empty text box and click paste again. Repeat the pasting step until all the text boxes in the document are filled with the merged fields. The document should now look like this:

Now that all the pertinent information is mapped into the word document, it’s time to mess with the aesthetics. We want to make sure everything is the right font size and that everything is centered and looks the way a mailing label should.
1. Hold down the “Ctrl” button on your keyboard and while holding that button down, press the “A” button. This is a shortcut for selecting everything on the page. This will allow us to edit multiple things at once.
2. Now that everything is selected, choose a font size that you’re happy with. I’m going to select a 12pt font. Also, I want to choose a new font style, so with everything still selected, I choose Arial.
3. Next, click anywhere inside the first text box. This will de-select everything. Now, right click your mouse in the first box and up pops a menu. Roll the cursor over “Cell Alignment” then select “Align Center Left” (it’s the first icon in the middle row of alignment icons).

4. Next, right click your mouse in the second text box and repeat previous step for each text box until the whole document is aligned properly as in the image below:

Now the template is complete and we’re ready to merge the data. Click the “Mailings” tab at the top of the tool bar. Then, select the “Preview Results” button.

Make sure everything looks as it should. If it all looks okay, then click the “Finish & Merge” button and select “Edit Individual Documents”. When you do this, a little box pops up asking you which records to merge. Select “All” and hit “OK”.
A new document has now been created with everything from your data list merged into the word document. You can now make any edits you want to each label incase some lengthy names or addresses created formatting issues. Once you look it over, put your Avery labels in your printer and print them out. I suggest saving the new merged document in case you have to make an edit or re-print. Otherwise if you close it out, you’ll have to re-merge.
I hope this tutorial has been helpful. Once you get the basic steps down, you can get creative with it. Here in the direct mail department at Vistage, I use this tool all the time for generating personalized letters for long lists of recipients.
Import Excel Data into a Word Table
This is method number 2 and it works equally well. However, this is not that advanced as it is in the first tutorial. However, you can do your job pretty well.
To get started, open Excel and enter all the details you want to import into Word table.
Select all the rows and columns > copy them.
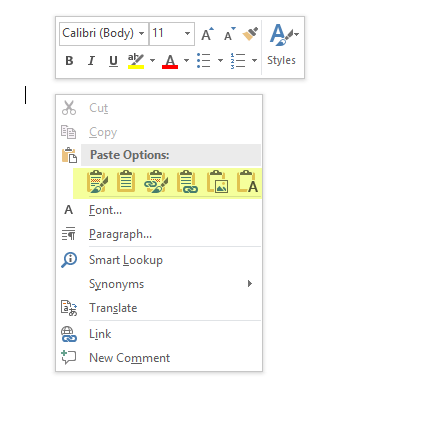
Open Microsoft Word and right-click on an empty space. You can find some Paste Options as shown in the following image-

Now you can hover your mouse over some of the options and check which one is right for you. Upon selecting an option, your Excel data will be imported into Word table.
This is a guest post from Athan Anas is the Direct Mail Coordinator at Vistage International, an executive coaching organization that helps CEO members build better companies through unique business coaching and executive development opportunities.
