How to Remove Duplicate Rows in Excel and Google Sheets
Let’s assume that you have two Excel sheets containing 50 rows in each sheet. After merging, you can find some duplicate rows in your spreadsheet. If there are ten duplicates, this is quite easy to delete them one by one. However, let’s think that you have a spreadsheet containing 1500 rows and you want to remove duplicate rows in that spreadsheet. In such cases, you can use this following trick to remove duplicates rows in Excel and Google Sheets.
How to Remove Duplicate Rows in Excel
If you are using Microsoft Excel, this is very easy to remove duplicate rows since there is an inbuilt option given by Microsoft. You can find the option in Microsoft Excel 2016 edition. However, I am not sure, but there is a high chance of getting the same option in another version of Microsoft Excel as well. This trick also limited to the desktop edition of Microsoft Excel. You cannot find a similar option in Excel Online.
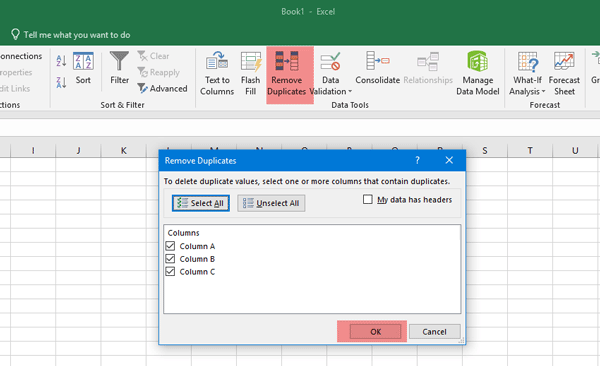
To get started, you obviously need to open Microsoft Excel and the file in this app. Therefore, switch from Home tab to Data tab in Microsoft Excel. You can find this option in the top menu bar. In the Data tab, you can find an option called Remove Duplicates.

After clicking the “Remove Duplicates” option, you can find a popup window on your screen, where you can choose the columns that you want to check for finding duplicate entries.
If you want to remove all the duplicates from the core, you should make sure that all the columns are checked in the popup window. Therefore, click the OK button.
Within moments, it will delete all the duplicate rows. To be more specific, only first entry or row will be intact. The second and other duplicates will be removed automatically.
How to Remove Duplicate Rows in Google Sheets
Although Microsoft Excel can remove duplicate rows without third-party software support, you must have an extension if you want to do the same in Google Sheets. As Google Sheets doesn’t have any such option, you need an add-on called Remove Duplicates.
Therefore, head over to this page, and install the add-on, at first. After installing, open the spreadsheet in Google Sheets. Therefore, go to Add-ons > Remove duplicates > Find duplicates or uniques.

Therefore, it will select the rows and columns automatically, and you can see that in a popup window. However, if you want to select custom rows and columns, you need to make that selection in this same window. After selecting, click the Next button.
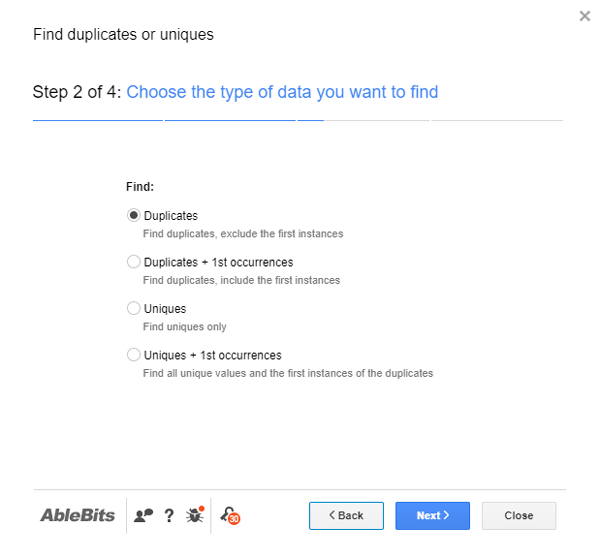
Then, you can select what you want to find. For example, you can choose one option among these four-
- Duplicates
- Duplicates + 1st occurrences
- Uniques
- Uniques + 1st occurrences

Choose Duplicates if you want to find duplicate rows and click the Next button. Then, it will show all the duplicate rows and columns. You need to select the rows and columns and click the Next button again.
Therefore, you can select what you want to do with the duplicate rows. For example, you can do these following things-
- Fill with color
- Add a status column
- Copy to another location
- Move to another location
- Clear values
- Delete within selection
Select either Clear values or Delete within selection option and hit the Finish option.
That’s all! Hope these simple tricks would be helpful for you.