How To Check DNS Server On Windows, Mac, Android, iOS
Domain Name System or DNS helps you connect your domain name with an IP address so that you can show your content through your website. If you are creating a website and you want to check the DNS server after installing WordPress or any other blogging platform, you can check out this article. Here are some tools and methods so that you can check the DNS server on Windows, Mac, Android, and iOS. all the following mentioned software are free to use, and you can use all the online tools for free as well.
How To Check DNS Server On Windows
This is very easy to check the DNS server on Windows 10 and any other older version, including Windows 7, 8, 8.1. There are several ways to perform this task on a Windows computer. Some of the methods require third-party software, and some of them do not require such thing as the in-built options are more than enough.
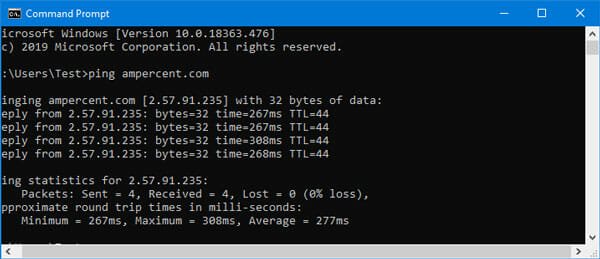
Using the Command Prompt is the simplest way to check the DNS on a Windows computer. No matter whether you are using Windows 7 or Windows 10, you can use the Command Prompt to get the current IP address assigned to a domain name. To get started, open a Command Prompt window and enter this command-
ping domain.com
You should get a result that looks like this-

The IP address mentioned in the result is the current IP address of that domain.
The problem with this method is that you cannot check other DNS records apart from A record.
How To Check DNS Server On Mac
If you are using a Mac computer, the process is almost the same as Windows. In other words, you can use the Terminal to get the job done on a Mac computer. No matter which Mac version you are using on your computer, you can certainly perform this job without any problem.
To get started, press Command+Space and type Terminal. If you already pinned the Terminal in the Dock, you can open it from there also. After opening the Terminal on your computer, you need to enter the same command as Windows. The command looks like this-
ping domain.com
You can get a result containing an IP address, which indicates the currently assigned IP address with that domain.
How To Check DNS Server On Android and iOS
If you are using an Android or iOS mobile, and you want to check the IP address of a website, you need to take the help of a third-party application. Although Windows and Mac users can perform the job with third-party software, Android and iOS users need to install some app to get it done.
1] PingTools Network Utilities (Android)
PingTools Network Utilities is available for Android 4.4 or later versions, and it does the job pretty well. You do not have to spend a lot of time to find out the hidden IP address. How these app works is nothing unique as it uses the ‘ping’ technique to fetch the IP. If you enter a website name, it will ping the server and gather the return IP address. Apart from showing the IP address, you can do more other things such as Traceroute, scan port, Whois check, etc. The best thing is that you can find the DNS that you are using currently in your mobile. Download
2] iNetTools (iOS)

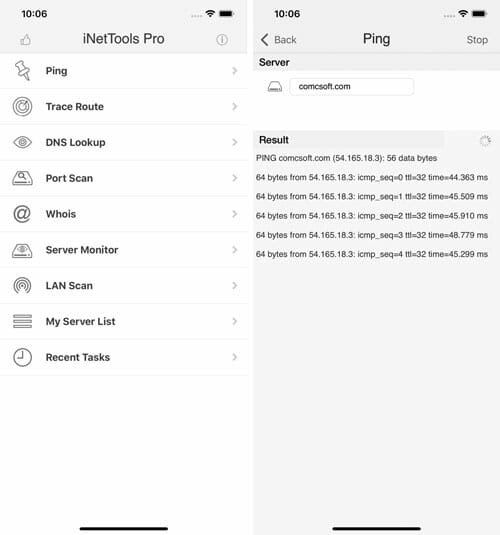
iNetTools is compatible with iPhone as well as iPad – you need iOS 11.0 or later version only. The user interface of iNetTools is pretty good, as all the options are well organized. Talking about the features, you can find several options such as Ping, Trace Route, DNS lookup, etc. If you want to check the IP address of a website, you need to use the Ping functionality. On the other hand, if you want to get the Name Server, you can try out the Whois lookup feature and DNS lookup functionality. The result is neat and clean so that users do not face any problem understanding the outcome. Download
There is a different DNS record that you might like to know. This kind of record helps you understand what network you are using and if your internet connection has any problems or not. Although Android and iOS users can install the same aforementioned apps to check that information, you need to do something different if you are using a Windows or Mac computer.
Check DNS on Windows
This is very easy as you do not need to install any third-party software. The in-built tool, Command Prompt, can do the job without any issue. The best thing is that it shows every possible detail on your screen. To get started, open the Command Prompt and enter this command-
ipconfig /all
It should display the MAC address, primary DNS, Subnet Mask, and more other information.
Check DNS on Mac
If you are using a Mac computer, you do not need to enter any command or something as Apple included an option to display the DNS servers directly. To get started, open the System Preferences window, and click the Network button. In the next window, you can find all the network names. Select a network name from the left-hand side. After that, you need to click the Advance button that is visible on the bottom-right corner of that window.
[image]
Now you can find several tabs, including DNS. Switch from the current tab to the DNS tab to check the DNS servers on your screen.
That’s all! I hope these simple tutorials will be helpful for you.