How to Boot Windows 10 in Safe Mode
Windows 10 is one of the smoothest operating systems of Microsoft. It has so many handy features and that is the reason why more than 70 million people are using right now. Although, Microsoft have made a huge change into Windows 10 to make it better and better, yet, some core features or old features are still available in Windows 10. For instance, the safe mode.
What is Safe Mode?
Safe Mode is a simple term to describe a particular thing of Microsoft Windows. If you know what it is, that’s fine. If you do not know what it is, let me explain. Safe Mode is such a mode of Windows that helps users to detect the problems related to software, system file or anything else. You can troubleshoot near to any kind of problem from Safe Mode.
There are different modes under the usual Safe Mode. You cam boot your PC without any third party software or system settings changes. In this mode you will not be able access internet, use software or do anything so that you can detect actual problem. (There are different method to do so)
In the other Safe Mode, you can boot your PC with networking support, which will help you to access internet and do some other additional tasks. In another version of Safe Mode, users can use Command Prompt and more other things.
However, by default, there is no Safe Mode in Windows 10. Yes, Microsoft have included it into Windows 10 but that is not enabled. You have to enable it after installing Windows 10. Otherwise, you can get problems during troubleshoot.
Important Note: To enable Safe Mode in Windows 10, you have to perform a few couple of steps and you have to restart your PC. Therefore, this is recommended to write down the following steps in your notebook or open this same page on your mobile or another PC. Otherwise, if you try to remember it, there is a high chance that you can forget. This is just a precaution.
Boot Windows 10 in Safe Mode
To activate Safe Mode in Windows 10, do follow the following steps.
Generally, if your Restart your PC, it will perform the normal boot. But, you need all the boot options to get things done. To do so, press Win + I and go to Update & Security option. Therefore, switch to Recovery option and click on the Restart Now button that is positioned under Advanced startup.
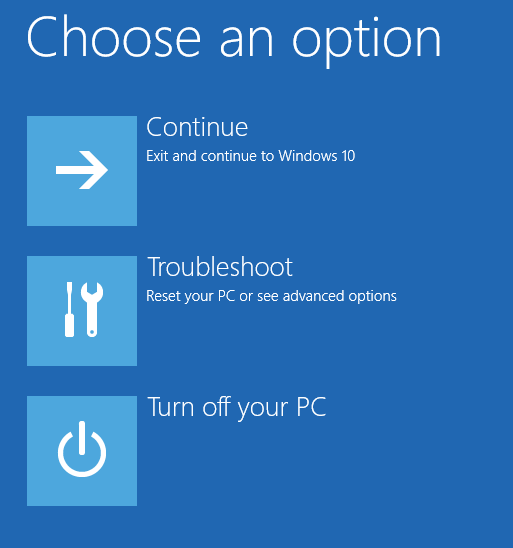
It will let your Restart your PC and open all the options directly. Therefore, you will get the following options.

If you have dual boot, you will get that second OS on this screen. Just click on the Troubleshoot button. After that, you will get two options,
- Reset this PC
- Advanced options

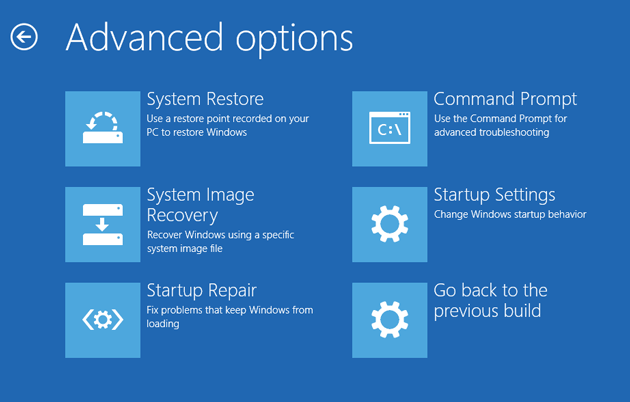
Click on Advanced options. Now, there would be six options.
- System Restore
- System Image Recovery
- Startup Repair
- Command Prompt
- Startup Settings
- Go back to the previous build

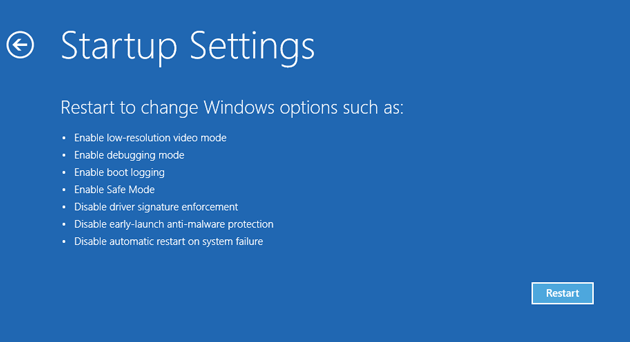
Click on the button that says Startup Settings. Following that, these following options will come out.
- Enable low-resolution video mode
- Enable debugging mode
- Enable boot logging
- Enable Safe Mode
- Disable driver signature enforcement
- Disable early-launch anti-malware protection
- Disable automatic restart on system failure

As usual, you need to hit the Enable Safe Mode button. To do so, just hit your 4 key on your keyboard. Some machines will display ‘Safe Mode with Networking’, ‘Safe Mode with Command Prompt’ etc. If you want to enable anyone of them, just hit the corresponding key (4/5/6 etc.) on your keyboard. Your PC will start in Safe Mode and you can figure out any problem.