How to Get Hibernate on Windows 10
Windows 10 is certainly a remarkable operating system, which doesn’t need any introduction to let you know about its awesome features and new inclusions. In other words, Windows 10 is that operating system, what people were looking for. With new start menu, Action Center, Settings panel etc. Windows 10 has become one of the most popular OS out there. However, some features are still not available in Windows 10 – though it has included so many options, features and apps in the OS. At the same time, Microsoft has included some features but they are not enabled.
For example, the Hibernate option, which is included in Windows 10 but you cannot find it until you enable this option manually. But, before enabling it, do you know what is Hibernate?
What is Hibernate?
Hibernate is a power option, which comes with almost all versions of Windows. When you Hibernate your PC, your PC pauses all the tasks and apps for as such time as you want and when you will turn on your computer, you will get them back and resume your work from the same stage. Although, Sleep mode requires little power to keep running all the apps and background processes, but hibernate doesn’t need any power. That means, you can completely power off your device and move it to anywhere and keep all those paused tasks. This is why Hibernate is more popular than Sleep mode.
As mentioned before, Hibernate is available in Windows 10 but you cannot get it until or unless you enable it manually. To get Hibernate on Windows 10, you have to follow these steps.
Get Hibernate on Windows 10
This is very easy and not much time consuming. As this is an in-built option, you do not have to install any third party software. Just follow these steps.
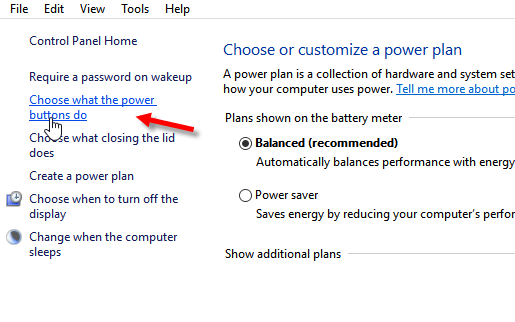
At first, open Control Panel. You can open that from anywhere like Taskbar search box, Win + X menu, Start Menu or anywhere. After opening Control Panel, switch the view to Large Icons. Here you can find “Power options”. Click on that. Now click on click on “Choose what the power buttons do” from the left pane.

Now, you can get a link labelled “Change settings that are currently unavailable”. You have to click on this link. Now, scroll down and find out Hibernate button. Following that, make a tick in the corresponding checkbox.
At last, don’t forget to save your changes. That’s it! Now you can get Hibernate option everywhere.
How to Hibernate computer when you close the lid of your laptop?
There are many people, who want to use Hibernate or pause their work when they close the lid of their laptop. It saves a lot of time. You do not have to turn it off manually. Whenever, you want to hibernate your PC, you can just close the lid. To get this feature, do follow these subsequent steps.
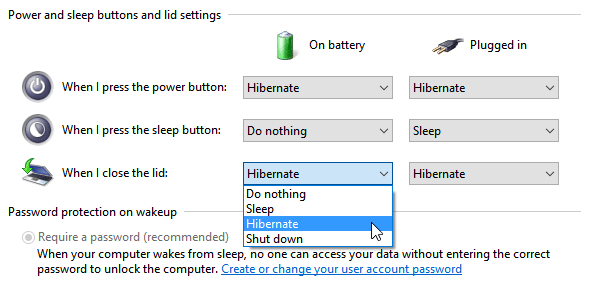
At first, open Control Panel and go to Power Options. Here, you will get an option called “Choose what closing the lid does”. Click on that. Now, select Hibernate from the drop down menu that comes under the option called “When I close the lid”.

You will get two different drop-down menu eg. On battery and Plugged in. Choose Hibernate from both drop-down menus.
That’s all! Hope it will help you a lot.