Fix: You’ll need a new app to open this ms-windows-store
Windows Store was introduced a long time ago by Microsoft. As the name defines, Windows Store is quite similar to Google Play for Android and App Store for Mac. In other words, you would be able to download tons of free apps and games to your computer in Windows machine. However, if you are getting an error message like You’ll need a new app to open this ms-windows-store, here are some possible solutions that will let you fix the issue right away.

This problem occurs when you upgrade your Windows 10 computer from an older version to a newer version. Also, it can happen after installing different Windows updates. No matter what is not the root of this problem, but you can solve it with the help of this tutorial.
Fix: You’ll need a new app to open this ms-windows-store
As mentioned earlier, there is no such one-click solution. You need to try out these following solutions one by one to check which one does work for you.
1] Reset Windows Store
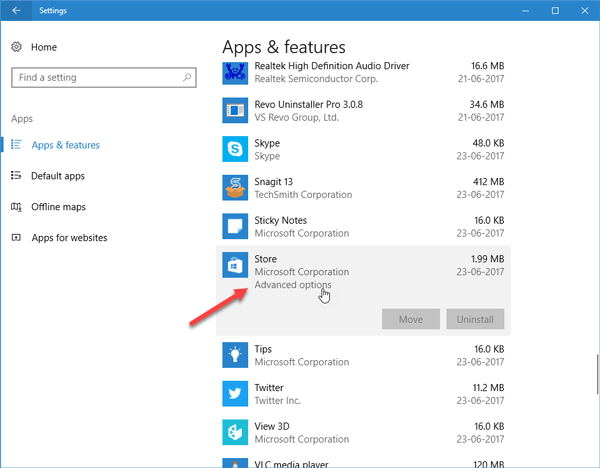
This is probably the best solution, and it has worked for many people, as per the record of various forums. Therefore, you can also try this out. If you reset your Windows Store, all the existing data will be deleted. However, apps won’t get removed. There is a simple way in Windows 10. You can use the Settings panel to get it done. Therefore, press Win + I to open Settings panel in Windows 10. Following that, navigate to Apps > Apps & features. Find out the Store option and click on Advanced options.

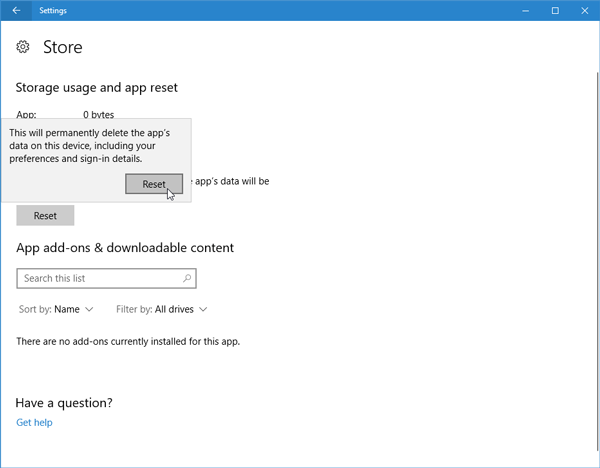
Now hit the Reset button on your screen. After clicking once, you would get a confirmation dialog, where you need to hit the Reset button again. That’s all! It should do the job right away.

Also, you can search for WSReset.exe in the taskbar search box and open that with administrator privilege. It would open the Command Prompt window and reset Windows Store immediately.
2] Reinstall Windows Store
If the above-mentioned solution is not working for you, you need to reinstall the Windows Store. Thanks to Windows 10’s smooth PowerShell that allows users reinstall Windows Store within moments. You just need to enter few commands to get it done. At first, open Windows PowerShell with admin privilege. To do so, press Win + X, and select Windows PowerShell (Admin). Now enter the following command to get the PackageFullName-
Get-Appxpackage –Allusers
Now you should find the Full Package Name of Microsoft Store what you need to copy and replace PackageFullName with that in the following command-
Add-AppxPackage -register “C:\Program Files\WindowsApps\PackageFullName” –DisableDevelopmentMode
Or, you can copy InstallLocation and replace the AppInstallLocation with that in the following command-
Add-AppxPackage -register “AppInstallLocation” –DisableDevelopmentMode
3] Run Windows Store Apps Troubleshooter
You can find some in-built troubleshooters in Windows 10. Although old Windows version users had these troubleshooters, they are much powerful and handy now. You can find various troubleshooters to fix common issues like this. To get started, open Windows 10 Settings panel. For that, press Win + I buttons together. Following that, navigate to Update & Security > Troubleshoot. Here you can find a label called Windows Store Apps on your right-hand side. Expand the option and click ‘Run the troubleshooter’ button.
Following that, follow the screen options and instructions to run it accordingly.
4] Rename Cache Folder
Your system creates a cache file whenever you open an Windows Store app. Many times, resetting the cache can help you fix this issue. There is no need to use any third-party tool to do that. Just follow the following steps to rename cache folder.
At first, navigate to this folder-
C:\Users\<your_username>\AppData\Local\Packages\Microsoft.WindowsStore_8wekyb3d8bbwe\LocalState
In the LocalState folder, you should find a folder called Cache. You need to rename this folder to something else. After that, create a new folder and name it as Cache. Then, restart your PC and check if it solves the issue or not.
5] Create New User Account
Sometimes some internal files can make this conflict. At such moments, you can try to create a new user account and check if the problem remains or not. It is quite easy and there is no need to use any third-party software to get it done. You need to open Windows Settings panel and go to Accounts > Email & accounts. In this page, you should find an option called ‘Add an account.’ Click this button and follow the screen options to create a new account.
Alternatively, you can enable the hidden administrator account as well. You need to open Command Prompt with administrator privilege to do that; and the following command to do rest of the job.
net user administrator /active:yes
After entering this command, sign out from your current account and log in to the new administrator account. After that, check if the problem still exists or not.
6] Use System Restore Point
If you have installed a new software and the problem has started appearing after that, you need to uninstall that app. However, some problem may not go away even after uninstalling that application. At such moments, you need to use the system restore point to revert Windows back to a certain time when there was no such issue. The system restore point is an in-built feature. You can make use of this facility if you have create a system restore point previously.
That’s it! This is as simple possible. Hope these two solutions would be helpful for you.
This one worked for me. Good Luck.
https://appuals.com/temporary-profile-issues-in-windows-10/
Solution 2 worked in this link.
Need to add a line : we have to delete that key which has the same name like the original / inaccessible profile key. Click on any SID key to highlight it. Delete the keys that have C:\Users\TEMP in ProfileImagePath file . and rename the profile with the key .bak. and remove .bak from its name. the profile key which have C:\Users\TEMP in ProfileImagePath file and the original profile key will be with same name.