Fix External Hard Drive Is Not Showing Up On Windows 10
If you have recently bought an external hard disk or you already have one, but your Windows 10 computer is not detecting the external HDD or SSD, here is what you can do to troubleshoot the problem. Getting the USB Device Not Recognized is a very common issue on Windows 10, and many people get it after an update or fresh installation of Windows. It does not matter when you are getting this problem, you can fix it with the help of this tutorial.
1] Check USB Port
No matter if you are using a laptop or desktop computer, getting damage to USB ports is very easy. Many people destroy their USB ports within six months of purchase a new computer. Therefore, this is always a good option for you to verify if the USB port is working or not. There are two methods to validate that. First, you can plug in another USB device like pen drive, data cable, etc. and check if that device is working or not. Second, try another port to connect your external hard disk. If it gets connected, that means you have a faulty USB port, and you know the solution.
2] Verify The Hard Disk
Like USB port, you should check if your hard disk is working correctly or not. Many people spend countless amount of time on the hard drive when the HDD is faulty. If you want to save some time, do connect it to another computer and check if you can find your hard disk or not. If not, you need to head to the service centre. If you can see your hard drive on the second computer, you need to keep following these steps.
3] Check Disk Management
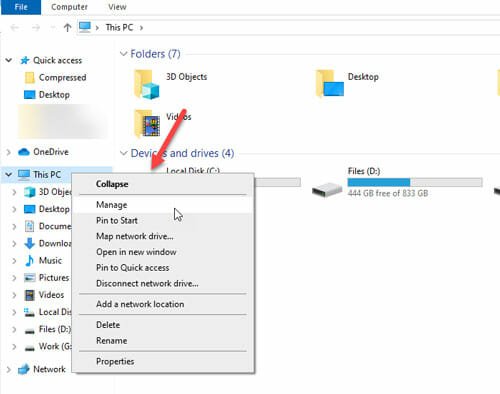
Disk Management is an in-built tool of Windows, and it is given in Windows 10 too. You can check all the hard disks plugged to your computer in the Disk Management panel. Therefore, open it up and check if the external device is visible or not. For that, open the Windows Explorer on your computer when your external hard disk is plugged in and right-click on the This PC option that is visible on the left-hand side. Following that, you need to choose the Manage option.

After opening the Computer Management windows, click the Disk Management option under the Storage section. Now, you should see your hard disk in the available list.
4] Change Drive Letter
Sometimes this conflict occurs due to the drive letter and path. The drive letter defines the drive when you have identical names. Therefore, you can change it and check if the problem remains or not. To do so, there is no need to install any third-party software since the in-built functionalities can do the job efficiently. However, your hard disk must be visible in the Disk Management window.
To get started, open the Disk Management Windows and right-click on your external hard disk. From the list, do select “Change Drive Letter and Paths” option.
On the next window, you need to click the Change button and select a different drive letter for the drive.
After saving this change, open This PC and check if you can see your external hard disk or not.
5] Update Or Reinstall Device Driver
Every USB device comes with a driver that gets installed when you plug in the device to your computer for the very first time. If there is some issue with the device driver, this problem might occur. Therefore, you can update or reinstall the device driver to make sure that never happens again.
For that, open the Device Manager and right-click on the proper driver. You can find all the USB drivers under Universal Serial Bus controllers section. From the context menu, do select Properties and switch to Driver tab.

Now, you need to use the Update Driver option to update the driver. On the other hand, if you want to reinstall it, you need to remove the driver first. For that, click the Uninstall Device button and reinsert your USB device.
The driver will be installed automatically.
6] Create New Partition
If you got malware on your computer, and external HDD was plugged in at that time, there is a chance of getting corruption. To get rid of that problem, you need to format your hard disk and create a new partition. You can use the Disk Management panel to do the job. At first, right-click on the external HDD, and select Format.
After doing that, right-click on the same device, and select New Simple Volume.
You might need to assign a new drive letter, path, file system, etc.
7] Turn Off USB Selective Suspend Setting
By default, Windows 10 uses USB selective suspend setting functionality that blocks individual port based on various power settings. That might be a cause of your problem. Therefore, you should disable it and check if the problem goes away or not.
For that, open the Control Panel on your Windows 10 computer. You can use the Taskbar search box to find that out. In the Control Panel, do find “Power Options.”
No matter which power plan you are using, you need to click the respective “Change plan settings” option. After that, click the option that says “Change advanced power settings.”
Now find out USB settings > USB selective suspend setting. Click the Enabled option and select Disabled from the drop-down menu.

8] Contact Manufacturer
If none of the above-mentioned tutorials works for you, this is the time to contact the external hard disk manufacturer. Sometimes a new hard disk can contain a defect which cannot be solved from home.