Filmic Pro Tips and Tricks to Be a Professional Videographer
Do not have a DSLR Camera? Want to shoot videos? It is sorted out now; you can shoot videos with your mobile like a professional videographer. Filmic Pro is probably the best option for you. Although this mobile application is quite expensive as compared to others but the things with which it comes are worth paying. If you are a new Filmic Pro user and you want to learn more about this tool, this article would help you out. You need to check out these tips and tricks for Filmic Pro app for Android.
Filmic Pro Tips and Tricks
Having a DSLR for recording video has a lot of advantages. However, if you do not have a DSLR and you want to record professional videos with mobile, Filmic Pro app can help you a lot. You can use this tool on Android as well as iOS devices. Therefore, these following tips and tricks will be helpful for you.
Set Resolutions, Aspect Ratio, Video Codec
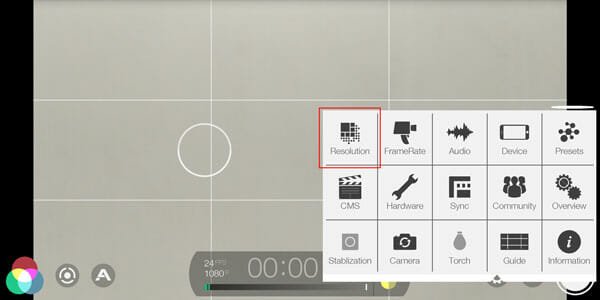
When you first set up a camera for video recording, these are the things you need to check. You should select the resolution as well as aspect ratio so that you get the video as you want. Filmic Pro has the option to set those up. For that, you need to open Settings and then go to Resolution. From here, this is possible to choose various aspect ratio like 16:9, 17:9, 1:1 and so on. Apart from that, you can choose whether you want to record video in 1080p, 2K or 4K. If you scroll down a bit, you can find an option to choose video codec as well.
Select Frame rate
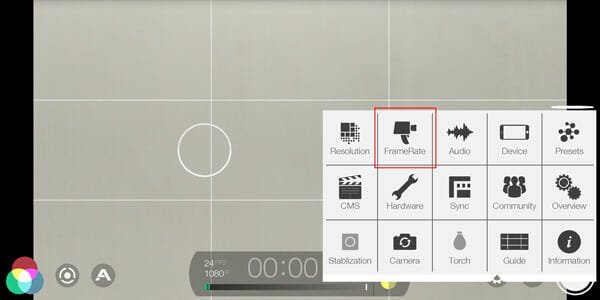
Frame Per Second or FPS is another important aspect that you need to set up before clicking the Record button. Based on your mobile’s hardware, you will be able to choose whether you want to record at 60FPS or 30FPS or 24FPS or any other frame rate. For that, you need to go to the FrameRate option in the Settings menu.
Choose Audio Recorder
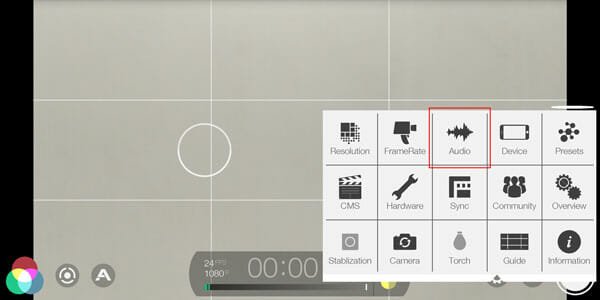
If you are making cinematic videos, you might not need the microphone or audio recording device since music does most of the jobs. However, if you want to use your mobile as a vlogging camera, you can choose the audio recording source. You can use the in-built microphone of your mobile’s camera, or you can use an external device. Also, you can choose the recording frequency. To change something, go to the Audio section and choose either Camera Microphone or External Microphone. If you want to record only video, you can enable the option that says Video Only.
Lock Exposure and Focus
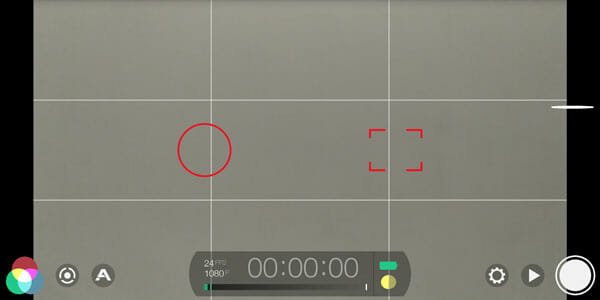
Many times we need to set a particular exposure and focal length so that you can keep recording your videos without any problem even if in broad and harsh daylight. Filmic Pro has such options that will let you lock exposure and focus. After opening the app, you can find two things on the screen, i.e., a circle and a square. The circle indicates the exposure and the square indicate the focus. If you have selected a particular exposure and focus and you want to lock it right there, just tap the buttons accordingly. It should turn into red, which means, you have successfully locked them.
Find Out Over Exposed or Under Exposed Object
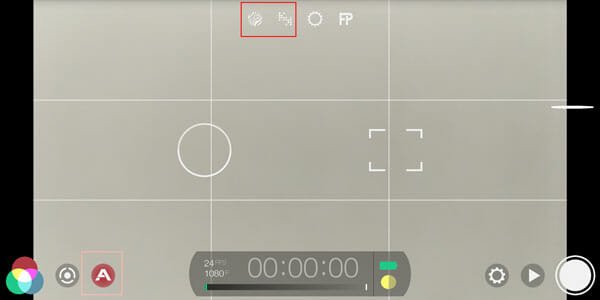
While shooting outside, you should check the whole frame for overexposed as well as underexposed areas so that you can correct them as you start shooting. For that, Filmic Pro has an option. You can find the “A” button at the bottom-left corner. Tap on it, and it will show four other buttons on the top of your screen. The very first option from the left will show overexposed areas in your frame and the second option from the left will show all the underexposed areas.
Enable Video Stabilization
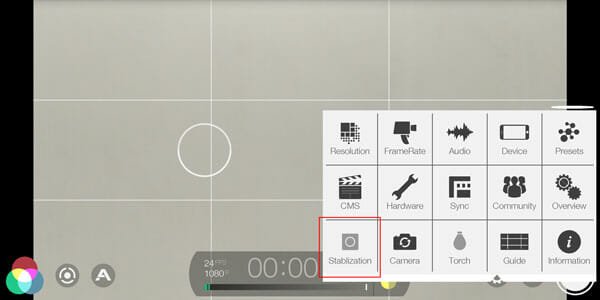
There are some mobiles that have video stabilization or EIS (Electronic Image Stabilization). Even though your mobile has it, Filmic Pro doesn’t enable it by default. Hence, you might get shaky videos. To fix this problem, you can enable the stabilization. For that, open the Settings menu and tap the Stabilization option. That’s all!
Change Highlight and Shadow in Live Camera
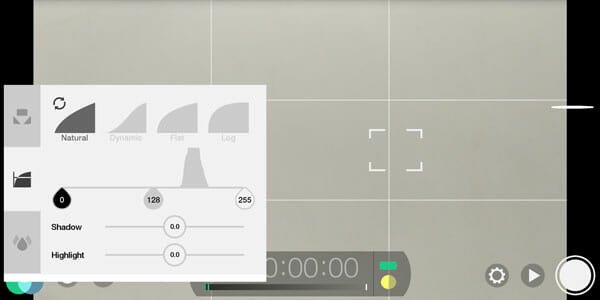
If you want to change the highlight and shadow in your live camera while recording, you can follow these steps. At first, open the Filmic Pro app. Therefore, you can find the RGB color circle that is visible in the bottom-left corner. Then, go to the second menu. Here you should find the option to adjust the shadow and highlight. You can move the bar to increase or decrease them accordingly.
Change ISO and Focus Manually
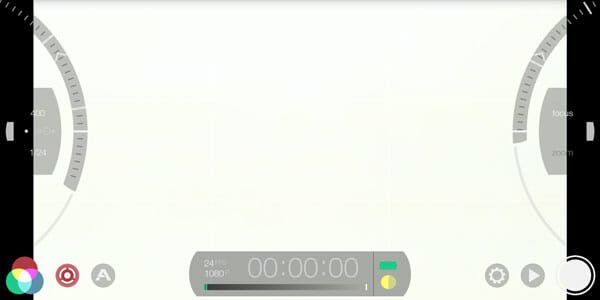
You can use the circle and the square icons to change the exposure as well as focus. However, if you want to change them manually, this option gets the job done. You can find a circle in the bottom-left corner. You need to click that button to unveil those options. You can see two bars on both sides of your screen. The left half-circle will let you change the ISO and shutter speed. The right half-circle will let you change the focus and zoom.
That’s all! These are all the basic things that you need to know to get started with this tool. Hope they will help you a lot.