How to Disable SmartScreen Filter in Windows 10/8/8.1
There is no doubt that Windows is one of the most popular operating systems for any kind of people. The latest version of Windows aka Windows 10 is probably the best invention of Microsoft as it is compatible with all types of people. No matter, whether you want it for business purpose or official usage, it will certainly fit with your demands.
Security wise, Windows is really awesome. Along with the standalone security shield, you can find some other security layers such SmartScreen Filter. SmartScreen Filter was introduced in Windows 8 when Microsoft launched Internet Explorer 8.
What is SmartScreen Filter?
SmartScreen Filter is one of the best security layers of Windows that scans all the files download through a web browser and shows security warning if it detects any suspicious file. If any file gets skipped from the in-built scanning of web browser, it goes through the SmartScreen Filter, which can check different things to detect a malware or any suspicious software. Therefore, you will get a better user experience on Windows as all the suspicious files will be out of your PC.
SmartScreen Filter was first introduced in Windows 8 and it worked through web browser. But, in Windows 10, you can find the SmartScreen Filter working as a standalone security shield. If you go to install any suspicious software on your computer, it checks whether that is malicious or not. If so, it will notify you immediately by a warning that looks something like the following picture,

It shows this text:
Windows protected your PC.
Windows SmartScreen prevented an unrecognized app from starting. Running this app might put your PC at risk.
That means, if you download any app from Windows Store, it won’t show any warning like that as all the apps of Windows Store are scanned and verified. Nevertheless, if you try to install any app from any unauthorized developer, you may get such warning through SmartScreen Filter.
Problem:
Although this feature seems very good and must have for your PC, but sometime, you may get the same problem while installing apps from trusted resource. It happens frequently on Windows 10. Therefore, if you are getting such warning oftentimes and would like to disable SmartScreen Filter in Windows 10/8/8.1, here is a solution. Although, this is not recommended, but this tutorial is for you if you wish to do so.
Disable SmartScreen Filter in Windows 10/8/8.1
Here are two different methods and both do the same thing. Therefore, you can follow any of the following guides.
Method #1
This would be executed through Control Panel and given option. At first, go to Control Panel and set the view to Large icons. Therefore, you can find Security and Maintenance. On the next screen, you will get an option labelled Change Windows SmartScreen settings.

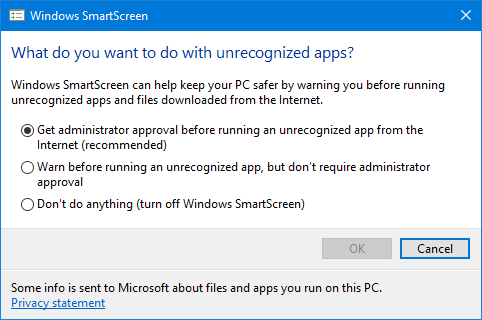
Just click on that. You will get a popup like this.

You have two options. You can either reduce the security or disable the SmartScreen Filter completely. Select the preferred option and hit the OK button.
Method #2
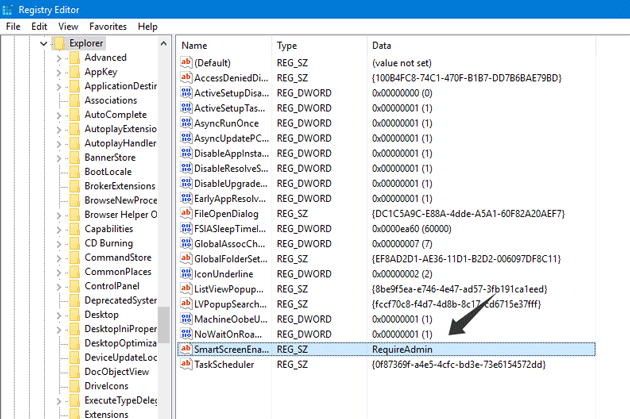
This would be done using Registry Editor, which doesn’t require any expert knowledge. However, this is a good practice to create a backup of your registry files and a system restore point before making any change in Registry Editor. Following that, open Registry Editor. To do so, press Win + R, type regedit and hit enter. Therefore, navigate through the following path,
HKEY_LOCAL_MACHINE\SOFTWARE\Microsoft\Windows\CurrentVersion\Explorer
On your right side, you can find a key called SmartScreenEnabled. By default, it should be set to RequireAdmin.

Just double click on this key and change the value. Set it to Off.
That’s it! SmartScreen Filter will be disabled immediately.