How to Configure Windows Live Mail For Gmail and Google Apps Accounts
Windows live mail which comes as a part of Windows live suite, is an excellent email client which can be used to send and receive emails from your Gmail and Google Apps accounts from desktop. If you are having problems receiving emails in Windows live mail, here is a complete step by step tutorial which will help.
The advantage of Windows live mail over Microsoft Outlook is the simple interface and the clear focus. I have been using Microsoft Outlook for some time now, but after trying Windows Live mail (wave 4), I think I will switch over.
Without further ado, here are the steps to configure Windows live mail client:
Configure Windows Live Mail For Gmail
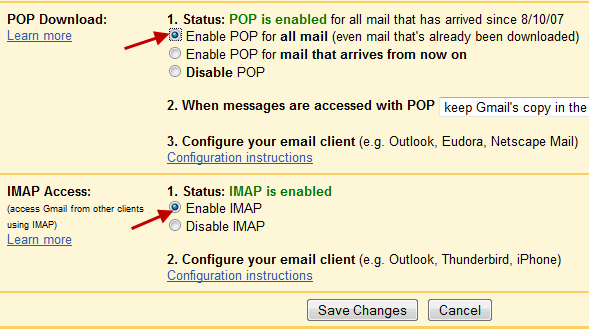
1. First login to your Gmail account, go to settings and select the “Forwarding and POP/IMAP” tab. Select “Enable POP for all mail” and enable IMAP access, as shown in the following image:

Configure Windows Live Mail For Gmail account
Check the radio button “Enable IMAP” and click “Save changes” at the bottom of the page.
2. Start the Windows live mail client. If this is the first time you are going to use Windows Live Mail for receiving email from Gmail at your desktop, you will see the following window:
Configure Windows Live Mail For Email account
If you are already using Windows Live mail for your other email accounts e.g Yahoo or Hotmail, you can click “Add an Email account” from the left pane of the program window.
3. Enter your Gmail account credentials in the respective fields. Make sure to enter the complete address as username@gmail.com and not username only.
Setup Windows Live Mail for Gmail Account
Also check the selection “Manually configure server settings for email account” and click “Next”
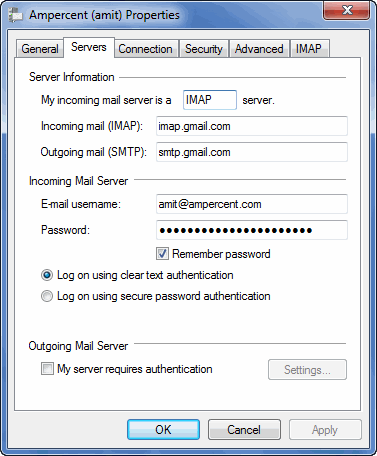
4. In the next Window, choose the incoming mail server type as “imap” and enter the incoming mail server address as imap.gmail.com. Then select the Outgoing mail server field and enter the address of outgoing mail server as smtp.gmail.com

Configure Incoming and Outgoing Mail server ports in Windows live
Make sure you select the correct port numbers for the incoming and outgoing mail servers of Gmail. The port numbers of incoming mail server should be 993 while that of outgoing mail server would be 465.
5. Select the check box “This connection requires a secure connection (SSL)” and click “Next”
6. You are all done. Hit “F5” or the sync button at the right top and Windows live will start fetching all the emails from your Gmail account and you can read or reply to them from desktop.
Completed Setup for Windows Live Mail
You can check whether the mail fetching works properly by sending a test message from another email account of yours or ask one of your friends to send a demo email message. (related tip: how to search old emails in Gmail)
Configure Windows Live Mail For Google Apps Accounts
For Google Apps, the setup is slightly different. Here are the steps:
1. Login to your Google Apps email, go to settings and choose the “Forwarding and POP/IMAP” tab. Select “Enable POP for all mail” and enable IMAP, as shown:

Configure Windows Live Mail for Google Apps Accounts
Click “Save Changes” at the bottom of the page.
2. Open Windows live mail client and click “Add an Email account” from the left sidebar. Then enter your Google Apps email credentials as shown below:

Configure Windows Live Mail For Google Apps Accounts
Also select the checkbox “Manually configure server settings for email account” and then click “Next”
3. In the next step, choose incoming mail server as imap.gmail.com and the outgoing mail server as smtp.gmail.com. Choose your email username as you@youdomain.com and enter the correct password

Google Apps IMAP Settings for Windows Live mail
The port numbers for outgoing mail server and incoming mail server are 465 and 993 respectively.
4. Hit “Save” changes and the configuration part is over.
Now you can sync all your email messages to desktop by hitting the “Sync” button placed at the right top of the Windows live mail window. Doing this will download all the labels, folders and archived messages kept in your Gmail or Google Apps account inside Windows live mail.
We highly recommend using Microsoft Outlook as an alternative desktop email client. Please check out our earlier tutorials on configuring Outlook 2007 and configuring Outlook 2010 for Gmail and Google Apps accounts.
More tips on Emailing:
1. How to send scheduled emails from Gmail
2. How to combine all email replies that respond to one subject
3. How to read emails as RSS feed to save time