Best Ways to Stabilize Shaky Videos
There are hundreds of Android mobiles those have a really good camera that you can use to shoot quality video. However, most of the Android mobiles do not have OIS or Optical Image Stabilization. Hence, when you record a video from a running car or train, it gets shaky, and as a result, it doesn’t look good. Now, if you have a good camera without OIS, and you want to stabilize your video, here are some of the best methods you can use. If you have an iOS device, you may not have to worry about this thing since most of the latest iPhones have OIS. However, if you do not have such a thing, you can utilize these methods to get it done.
Best Ways to Stabilize Shaky Videos
1] Adobe Premiere Elements

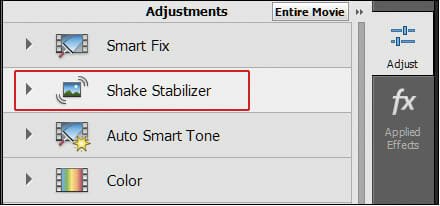
Adobe Premiere Elements is a very good, useful, feature-rich video editing tool that can do minor tasks like stabilizing a shaky video. If you want to spend some money to do a professional job, you can opt for this tool, which is very affordable and it does the job pretty well and fast. After installing this tool, you can find an option called Shake Stabilizer, which will let you stabilize the video if it is shaky. However, you will get four different options in this category. They are Stabilize Only, Stabilize-Crop, Stabilize-Crop-Auto-scale, and Stabilize-Synthesize Edges.
Under the Advanced section, you can find several options to adjust motion, smoothness, video frame, rolling shutter ripple, crop vs. smooth and more others. You can tweak a few settings and check which one works better for your video.
According to the official statement, video stabilization with Adobe Premiere Elements is a time-consuming task, and it consumes a lot of time. However, it depends on the video file that you are processing. In the meantime, you can find the tool quite slower. However, once the stabilization process is complete, you can find everything normal.
2] Filmora

Filmora is one of the best and easiest tools you can use to stabilize shaky videos. Filmora is being developed by Wondershare, which is a popular software development company. Filmora can do various tasks, and video stabilization is one of them.
The best thing is it doesn’t matter whether you have a Mac computer or Windows computer, you can still use this software for your benefit. Regarding compatibility, you should have Windows 7 or later version and Mac OS X 10.7 or later version.
After installing this tool, you should find out the option called Video Stabilization. After opening the corresponding window, you need to open up the video file that you want to stabilize. Following the selection, you can select the section that you want to stabilize. If you want to stabilize the whole video file, you can keep the sliders wide open. At last, you will have to click the Stabilize Video button. As usual, it will take some time to get things done. After completing, you can click the Save button to save it accordingly.
As this is a premium tool, you should know about the pricing of it. It starts from $9.99/month to $99.99/year. You can purchase whatever plan you want. All the PRO versions have the same options.
3] YouTube Video Editor
A few years ago, there were only a few couples of options in YouTube Video Editor panel. However, now you can find tons of options so that creators can manage their videos with ease. YouTube has been adding new features day by day for the benefit for content creators. If you are a YouTuber and you want to stabilize a shaky video, you can take the help of YouTube Video Editor, which has the option to stabilize shaky videos.
Basically, the YouTube Video Editor is a quite good video editing tool that helps you edit any video even when you do not have knowledge of using any professional editing software. Hence, you can take the advantage of this tool that you can access from any operating system including Windows, Mac, Linux, etc.
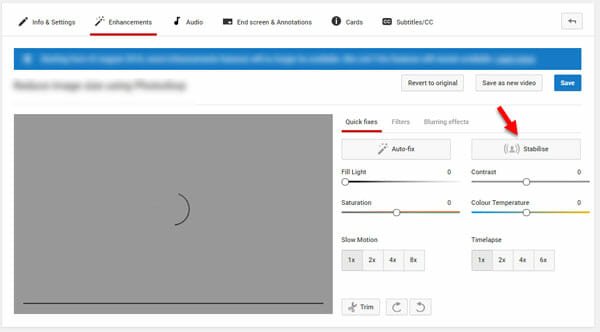
To get started, open up the YouTube Video Editor and upload a video that you want to stabilize. After opening it, you can find a tab called Enhancements.
After switching, you can find another option called Stabilize.

Click on it to stabilize the video based on your preference. It doesn’t take much time, and you can find the result swiftly. After saving the stabilized video, you can download it from the video manager panel of YouTube.
4] Google Photos
If you are using an Android mobile and you want to stabilize shaky video on Android, Google Photos is probably the best option for you. Google Photos is available for Android. In fact, most of the stock Android mobiles already have this tool installed on their mobiles. However, if you do not have this at all, you can download Google Photos from Google Play Store. This app is available for Android 2.3.3 or later version.
Although Google Photos is available for older Android versions, you may not find the Stabilize option in all the versions. For testing, I got a mobile running Android Oreo and the latest version of Google Photos. It doesn’t mean that you must have the same combination. You can try with older version as well.
Stabilizing videos with Google Photos is pretty easy, but it is quite time-consuming. While testing, it took almost five minutes to stabilize a 1.5 minutes video with a file size of 403 MB. However, it did the job pretty well and much better than any other tools.
To get started, you can open up the Google Photos app on your Android mobile and find out the video that you want to stabilize. Following that, tap on the Edit button.
After that, you will get the Stabilize option like this;

Tap on it to start the stabilization process. After completing, it will let you save the video if you want.
The best thing about this tool is you can use the video stabilization option without any internet connection.
That’s all! Hope these four solutions would be helpful for you.