Best Microsoft Word for Mac Tips and Tricks to be a Pro
It doesn’t matter whether you are using Windows or Mac, if you are a writer, you must know the software called Microsoft Word. Microsoft Word is one of the best writing tools out there, which is being used by millions of people from across the globe. No matter whether you are writing small paragraphs or long essay, you can certainly use Microsoft Word on your computer. However, if you have not used it earlier and you are just getting started with this tool, do check out these Microsoft Word tips and tricks so that you can use it like a pro.
Best Microsoft Word Tips and Tricks for Mac
P.S: All these tips are tricks are for Microsoft Word for Mac. Although you can find some of them on the Windows version, the steps would be quite different.
1] Show File Extensions

Let’s assume that you have some files on your desktop or any other folder and you want to sort files by type. If you do so, you will find files by file extensions. However, if you create a document file with Microsoft Word for Mac, you may not find the file extension of the saved document. No matter where you save it, you cannot find the file extension at all. Therefore, if you want to save the document and show file extension, here is what you need to do.
At first, open Microsoft Word and go to Word > Preferences > General. Following that, you will get an option called Show file extensions. By default, this option is not checked. You need to make a tick in the corresponding checkbox.
That’s all! After that, you can find the extensions on your desktop or any other folder where you have saved a document through Microsoft Word.
2] Change Image Paste Preference
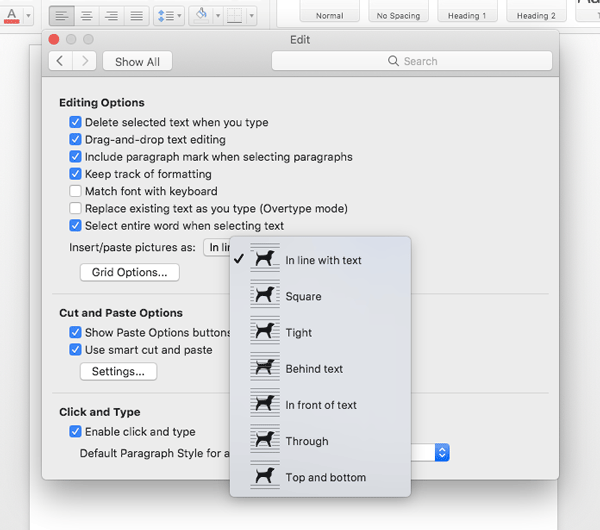
Let’s assume that you often need to paste picture in your document and you need to have a different option to paste that. Suppose you have to paste the image as square, or behind the text, or through the text, or something like that. You can certainly do that with the help of these options. Microsoft Word comes with some options those will let you do that or change the default settings without any problem. You can either make the change as save it as default or you can change the setting based on the picture. These following steps you be helpful if you want to change the default settings.
To get started, open Microsoft Word and go to Word > Preferences > Edit. Following that, you will get an option called Insert/paste picture as. Expand the drop-down menu to select anything among these following options:
- In line with text
- Square
- Tight
- Behind text
- In front of text
- Through
- Top and bottom
That’s all! From now on, your image will be saved as per your chosen option.
3] Check Grammar and Spelling while typing
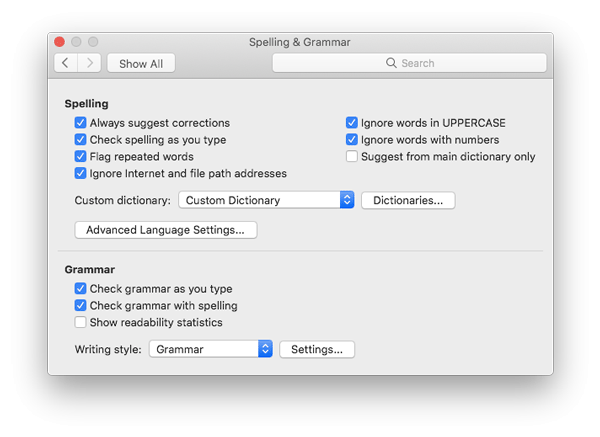
Suppose you are pretty weak in terms of spelling as you are new to a language. Or you just need to check the grammar and spelling so that you cannot end up sending a text with errors. At such a moment, you can use this option to check grammar and spelling while typing. Therefore, you do not have to check them manually. Although this option is enabled by default, if it has been deactivated by any mistake, you can enable it from here.
Open Microsoft Word and go to Word > Preferences > Spelling & Grammar. In this page, you can find an option called Grammar. Under this, you should find two other options called Check grammar as you type and Check grammar with spelling. If these two options are not checked yet, you need to make a tick in the corresponding checkboxes.
4] Check Printing Options
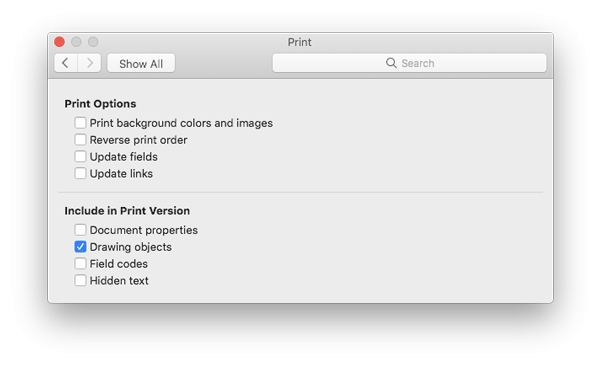
As this is Microsoft Word, you will get some options for printing so that you can print a document with ease. While printing, you may not find all the options, but there are some options you can check out. You can enable or disable any option you want according to your requirement. These are the following options you can find in the list:
- Print background colours and images
- Reverse print order
- Update fields
- Update links
- Document properties
- Drawing objects
- Field codes
- Hidden text
You can find these options at here: Word > Preferences > Print.
5] Edit User Information

When you are creating a document and you want to share it with someone or online, you should add the metadata so that your file doesn’t get stolen. Although Microsoft Word adds the metadata by default, that is not enough for any online work. Therefore, you can change the user information or metadata information with the help of these options. You can add user name, initial, company name, address, city, state, country/region, phone number, email ID, and so on. To edit them, go to Word > Preferences > User Information.
6] Save Document as Template/PDF

Let’s assume that you have created a document and you need to create more like that. Instead of making all the changes for every document, you can simply create a template. Following that, you would have to change the text or make minor changes to get things done. On the other hand, let’s think that you want to save a document as PDF, which is probably the most secure file format you can have. To do both of the things, you need to follow two different steps.
First, make all the change for the template and go to File > Save as Template. After that, you need to choose a location and give your file a name.
If you want to save the document as PDF, go to File > Save As. Therefore, choose PDF from the File Format menu. Hence, you need to select a location and give it a name.
That’s all! These are some of the small yet very handy tips and tricks you can change in Microsoft Word for Mac. Hope they would be helpful for you.
