How To Automatically Delete Message On iOS 12
If you get a ton of SMS and you often forget to delete unnecessary messages, you might get some help from this article. There are many people, who get a massive amount of SMS and they keep them. Sometimes we get an essential SMS that we need to check out within a time frame. However, if you often forget to open such messages and they are getting stored in your Messages app, you might need a cleanup process. It doesn’t matter why but if you want to delete messages automatically on iOS 12, here is what you can do.
It doesn’t matter whether you are a student, who needs a mobile with some educational apps or a businessman, who needs to install some CRM apps – you can certainly use an iOS device aka iPhone or iPad. Both of the devices are equally good. Like other Android mobiles, you can insert your SIM into an iPhone and send or receive messages without any internet connection.
As mentioned earlier, if you need to delete some SMS after a particular amount of time and if you do not want to do that manually, you can utilize the in-built functionality of iOS 12.
How To Automatically Delete Message On iOS 12
Please follow the following steps to delete SMS automatically from Messages app on iOS 12-
- Open the Settings app on your iPhone and go to Messages.
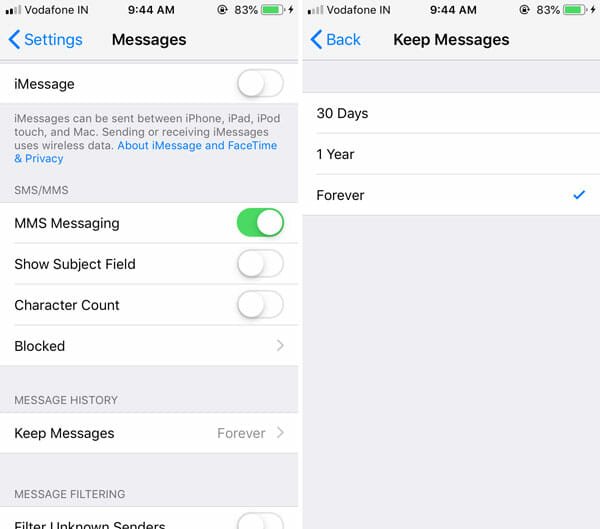
- You should find a label called MESSAGE HISTORY. Under that label, there is an option called Keep Messages. Tap on it.
- By default, it should be set to Forever. That means your phone doesn’t delete any message automatically. You need to select either 30 days or 1 year. As it defines, if you choose 30 days, your messages will be deleted after 30 days from receiving. On the other hand, if you choose 1 year, your phone will remove all the 1-year-old SMS.
That’s all! You should know that this aforementioned setting is for the text message only. If you want to delete the audio message, you can find a similar option for the audio message as well.
If you are using iOS 11 or older version, this is possible to delete 1-year-old conversations from iMessage. For that, you do not need to download any third-party app as well. To set it up, do follow these steps-
Step 1: Open Settings and go to General.
Step 2: Tap on iPhone/iPad Storage option.
Step 3: Scroll down and find out Messages option.
Step 4: You should find an option called Auto Delete Old Conversations. Next to this label, there is an Enable button. Tap on it to activate auto delete conversation feature.
That’s it! This is as simple as said.
However, if you want to use the Messages app to get self-destructing SMS, this might not be the ultimate solution since it takes 30 days to delete an SMS. That means if someone has sent you a piece of confidential information via SMS, it will stay in your phone for 30 days unless you delete that manually. If you want to get a self-destructing message app for iOS, you can check out this following list.
Best Self Destructing Message Apps For iOS
1] Snapchat
Snapchat is probably the best self-destructing message app for iOS. Snapchat deletes messages automatically after a particular amount of time. You must have iOS 10.0 or later version. Like WhatsApp, you can find a neat and clean user interface to send or receive messages. Also, you can send messages only to them, who are on Snapchat. Download
2] Telegram
Telegram is much more useful when you need a one-stop solution, and you are concerned about security and privacy. Many people use Telegram app to send self-destructing messages. As all the conversations are encrypted, nobody can view your messages even if it is not self-destructing. The UI looks pretty good, and you should not find any problem using it for a long time. Download
I hope this trick and apps will be helpful for you.