How to Use Dropbox to Host a Static Website For Free
Dropbox is my favorite backup tool which I regularly use to sync files across multiple computers at work. Apart from syncing files and folders, there can be a lot of more creative ways in which you can use Dropbox.
You can use it to sync your Outlook PST file or calendar data files across multiple computers. You can again use Dropbox to sync notes and to do lists and access them from anywhere you want.
Dropbox has a nice feature which lets you link to any file kept in the “Public” folder of your Dropbox account. Anyone, who knows the URL of the linked file can open it from the browser or download it. You can use this feature to host a static website in your Dropbox account for free.
Create a Free Static Website With Dropbox
1. First download and Install Dropbox in your computer and keep the Dropbox client running in the system tray.
2. Download a Free HTML template which you will be using to create the design of your static website. You can find a large collection of Free HTML templates here.
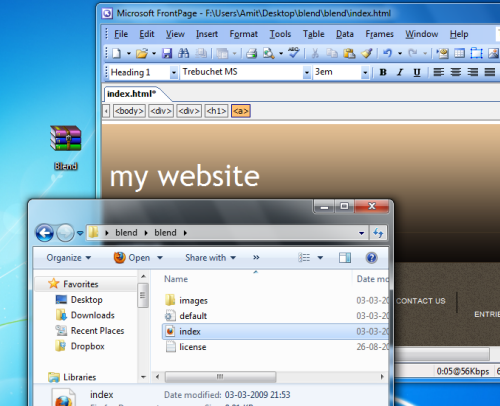
3. Extract the template and you will get a folder containing some files – index.htm, an image folder and a css file. Keep the content of this folder intact and open the index.html file in an HTML editor like Microsoft Frontpage or Adobe Dreamweaver.

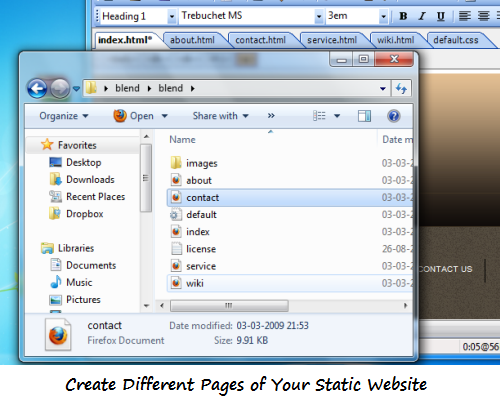
4. Edit the content of the page as you want your website to look. You can copy the index.html file in the same folder, rename it and create multiple pages of your static website.
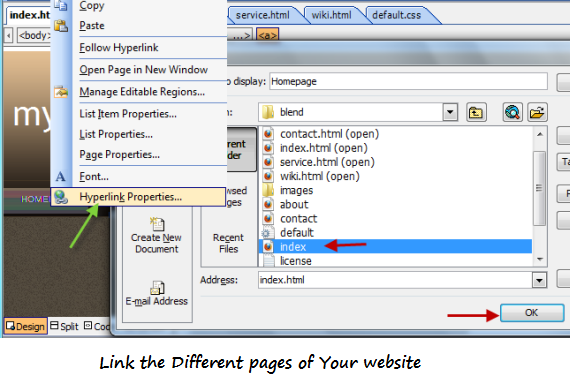
 5. To link the different pages of your mini website together, right click any text on an HTML page and select “Hyperlink”. Then browse to the folder in your computer and select the page you want to link to
 6. To add images and other graphic in your pages, place the image in the image folder of your template and drag and drop it in any HTML page. To add Youtube videos, get the embed code from the video page and add it in the source code of your website’s template.
7. Once you are done with all the editing stuff, open “My documents” folder from Windows start menu and go to My Dropbox > Public folder.
8. Paste the entire template folder in this “public” folder of Dropbox. You can rename the folder to any other name if you want (e.g My_college_projects )
9. Run the Dropbox client and let it scan your local Dropbox folder for new files. When Dropbox finds a new folder, it will upload all the content to your Dropbox account.
10. Once all the files are uploaded, login to your Dropbox account and navigate to the website folder, as shown below
11. Now copy the URL of the index.html file kept in the Website folder and you are done!
Congratulations, your website is now live on the web and you can share this with any of your friends by sending them the link to your website hosted in Dropbox. A good idea would be to shorten the URL using any of the URL shortening service so that the URL can be remembered easily. (see example)
Editing Your Website Hosted in Dropbox
If you want to edit your website which is hosted in Dropbox, simply open up all the files from My Documents > My Dropbox > Public > Website in an HTML editor and edit the files you want. Once you are done with all the changes, save them and it’s done. Run the Dropbox client and it will reupload all the files in the same location and the changes will be thus made on your website hosted with Dropbox.
You can use this trick to host multiple websites with Dropbox, just use a unique folder for a new website inside your public Dropbox folder. The free plan of Dropbox lets anyone use up to 2GB of free space which is more than enough if you have a few hundred pages on your website.
Is it legal to use Dropbox for Webhosting?
Dropbox itself suggests it’s users to host a quick website with Dropbox so there won’t be any issues unless you are going overboard and hosting sites containing copyrighted material.
Watch the Screencast
I have detailed the step by step procedure to use Dropbox for web hosting in the following screencast. Check it out !
Just did it :) thanks man..